Pages

Tuesday, 28 May 2013

28mm Ancient German Army

I thought I'd give the Ancient Greeks a rest for the moment, time for some proper barbarians to fight my Caesarian Late Roman Republican Armies. Starting with 3x General command stands, representing the German commander-in-chief/Tribal Chieftain and 2 other subordinate commanders.


The main man, The German Tribal Chief wearing captured Roman armour, and a shock of red hair. A mix of 'Wargames Foundry' & 'Black Tree Design' miniatures.

One of two subordinate commanders. The base is 60mm diameter mdf, 2mm thick
The last of the subordinate generals, I think it's always best to start at the top and work down army wise.
 A closeup of a bunch of unruly tribal warriors. Exclusively 'Black Tree Design' miniatures. All shield designs are hand painted.

German barbarians massing on the borders of Gaul offering the beginings of a serious threat to Roman expansion in Gaul. I have a shed load of these figures to paint, mostly 'Black Tree Design' miniatures which are properly good figures.

A German Warrior proudly shows off the latest addition to his collection.
I'll hopefully update this page as the painting progresses.


Wednesday, 8 May 2013

Horse Painting Guide for wargamers


A wargamers Guide to painting Horses.
(or why not paint every horse different?)

After trawling the 'interweb' I collected a few dozen examples of horse colour schemes to inspire me to paint my ancient Skythian horse archers and some Thracian mercenary cavalry -  mercenary units for my ancient Macedonian army and Greek Peloponnesian Wars Armies.

Here I'll try to jot down my notes for painting each horse really as a future reference. Otherwise I'll forget what I did, as usual.

Each horse will have a general coat colour & pattern - specified, then extras such as face markings, nose colour, mane. tail, leg markings and even eye colour etc. General colour guides can be good but photo reference is always the best.

The Method:
After buying some Skythian and Thracian cavalry on ebay a few weeks ago at a reasonable price I used the following process:

Preparation: All horses prepped with flash removed with a scalpel and needle files. Mounted onto cardstock with PVA glue, then undercoated in black enamel paint and left to dry.

Decide on first set of colour schemes lets say #1 Tobiano #2 Sabino #3 Chestnut #4 Bay.These all use the same colours but with different markings. The main colour is similar to 'burnt sienna' oil paint. The markings are cream.

scheme #1 A Tobiano Horse.
Okay now I know I'm going to use burnt sienna oil paint as the main colour I need to find a good under coat colour, this will be burnt umber oil paint. Why oil paint? because I can thin it out and it paints on like a dream, with oils as you add new layers you need to use thicker paint and on the final layer your brush strokes simulate the texture of the hairs on the horse coat (assuming you got the consistency correct).

I use 'Windsor & Newton Artists Oils' as they're good quality, with good pigments, don't bother with cheaper brands as they will be crap.The best oils are actually cheaper than acyrlic paints, last longer, have better pigments and you can mix them with enamel paints! The only dissadvantage is that they take longer to dry....


pic.1 primed black (enamel humbrol no.33) then undercoated brown burnt umber oil paint.
pic.2 brown areas brushed with burnt sienna oil, a tan colour (enamel leather humbrol no.62) as undercoat for the white areas.
pic.3 extra layers of burnt sienna oil for the brown areas, tan (enamel leather humbrol no.62) mixed with white for the white areas.
pic.4 markings picked out with cream (leather humbrol no.62 mixed with more white)

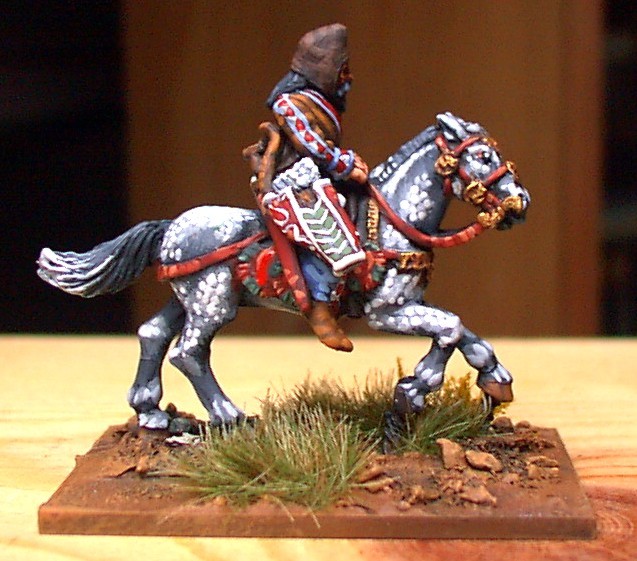
pic.5 & pic.6 details picked out with lighter shades, Absolutely no dry brushing used! Then at last the extras are painted such as face markings, nose colour, mane. tail, leg markings and even eye colour etc. All that is needed is a final coat of Testors dullcote varnish.

Tip: Yes you can mix oil paints with enamel paint to produce really good pigments (but if you mix enamel paint with enamel paint you tend to get a gungy colour and a headache).

Allow each layer to dry. If you make a mistake just wipe with a cloth doused in white spirit or turps and start again.

This is the first of  15 horses on their way, so I'll  leave it to dry and pick the colour scheme for the next horse.....

scheme #3 A Chestnut Horse.


pic.1 primed black matt enamel paint (enamel humbrol no.33) , then undercoated brown burnt umber oil paint.
pic.2 brown areas brushed with red enamel no.60 mixed with black enamel no.33.
pic.3 extra layers of burnt sienna oil paint brushed over the brown areas.
pic.4 markings picked out with greys and whites (enamel black no.33 mixed with more white no.34)


finished paint job varnished matt 'Testors dullcote' spray varnish.

scheme #4 A Bay Horse.
The Bay is very similar to the Chestnut except it has a black mane and tail and usually black legs.

pic.1 primed black matt enamel paint (enamel humbrol no.33) , then undercoated brown burnt umber oil paint.
pic.2 brown areas brushed with red enamel no.60 mixed with black enamel no.33.
pic.3 extra layers of burnt sienna oil paint brushed over the brown areas. Mane and tail painted black.
pic.4 markings picked out with greys and whites (enamel black no.33 mixed with more white no.34)


scheme #5 A Dappled Grey Horse.
Using matt black enamel (enamel humbrol no.33) mixed matt white enamel  (enamel humbrol no.34) as the main colour, it is just a case of mixing various shades of grey working up to lighter shades for the top coat, grey washes can be applied to tone down hard edges on the dappling.


pic.1 primed black (enamel humbrol no.33)
pic.2 grey areas brushed on, working up to a lighter colour.
pic.3 Dapple light grey applied then working up to white.
pic.4 horse furniture started.


The final figure is spray varnished in 'Testors dullcote' varnish.

scheme #6 A Piebald Horse.
no pic. primed black (enamel humbrol no.33)
pic.1 grey areas brushed on, working up to a lighter colour.
pic.2 Dapple light grey applied then working up to white.
pic.3 horse furniture started.


The final figure is spray varnished in 'Testors dullcote' varnish.

scheme #7 A Palomino Horse.
scheme #8 A Dun Horse.
pic.1 primed black matt enamel paint (enamel humbrol no.33) , then undercoated brown burnt umber oil paint.
pic.2 brown areas brushed with tan leather (humbrol enamel no.62) mixed with burnt umber oil paint. Then each successive layer of paint uses more tan in the mix, finally tan used on its own then slightly mixed with white enamel for the highlights. After that the black mane, tail and legs are painted, toned with grey.


Skythian raiders enmasse.


I'll update this page as I finish more examples...
To be continued :)


Saturday, 20 April 2013

28mm Ancient Macedonian Army continued


A Macedonian General's Command Base.


28mm Wargames Foundry Macedonians.

I primed these 'Wargames Foundry' minis in black enamel to give a good flat opaque undercoat, then primed the flesh areas with burnt umber oil paint, working through to burnt sienna acrylic then mixing with flesh tones. Each stage was allowed to dry fully, then the browns (several different types) of the leather straps, shoes were painted. The metals were dry brushed (gold enamel and  bronze enamel) on then cleaned up with oil washes flooded over to give a worn look then highlighted with acrylic gold paint. Oil paints Enamel paints and acrylics were used to produce various effects.


The basing was the almost last stage, the miniatures are supaglued to a 60mm round mdf base resulting in a compact vignette. Polyfilla was added to level off the ground, then PVA glue was liberally brushed on with an old no.2 brush,  rocks were sprinkled over the area then sawdust of various grades applied. The dirt/earth effect was obtained by mixing burnt umber oil paint with enamel leather colour, then dry brushing in lighter tones of burnt umber oil paint/leather enamel/yellow enamel/white enamel building up to the lightest colour.

The gold laurel pattern on the generals cloak was painted with burnt umber oil mixed with leather and yellow enamel and highlighted with yellow/white. Grass and flowers and a scrub bush were added before the final coat of 'Testors Dullcote' matt varnish.

This command base will form part of my ancient Macedonian army as an allied general, I did want it to represent king Perdikkas II at the time of the Peloponnesian War but the coins of the reign of Perdikkas show a different helmet design, a Corinthian helmet in style, so I think I'll have to do a conversion on another miniature another day.

The mdf base is from http://www.warbases.co.uk the grass is from 'Army Painter' available from most wargames online stores, the yellow flowers from http://www.tajima1.co.uk and the small bush I made myself.

Thursday, 4 April 2013

28mm Ancient Spartan Greek Army - The Peloponnesian Wars.

I've started to finish the hoplites for my 28mm Spartan Lacedaemonian Army. The Spartans forming the backbone of the Lacedaemonian alliance with their officer corps the Spartiates providing the elite fighting units. Reputedly dressed in red on the battlefield. Sparta was made up of the Dorian race slow to go to war but an implacable enemy.

(Lacedaemonian possibly pronounced as: Lass-ee-day-mo-nee-on).

I've chosen these Spartans to represent the army of the Peloponnesian War 431-404BC era for a future campaign. The Lacedaemonians with the help of many allies and Persian money  finally crushed the Athenian empire thus ending the war.
The Spartiates.


The bulk of the levy hoplites are mainly Wargames Foundry figures with the veteran armoured heavies or Spartiates made up from Gorgon miniatures figures wearing classic hand-me-down bits of armour from older wars. I haven't painted the shields for the Levy hoplites (in the background) yet. That'll be a major job as I don't use transfers myself, all my shields are hand painted.


Spartan general Brasidas and chums. The Lacedeamonian command base isn't quite finished. These are 'Gorgon Miniatures' Spartans which are a perfect compatibility match for 'Wargames Foundry' figures


I had to paint the gorgon's head on the shield and paint eyes on each of the characters.

Spartan Light Troops.
Helot slingers.

I've only acquired a small unit of 8x helot slingers at the moment, I'll probably use Gorgon miniatures mostly for the archers, light javelinmen and the remaining slingers mixed in with a few Wargames Foundry figures. Then comes the cavalry, mainly light horse maybe with a few heavier mercenaries....to be continued.

Spartan Light Cavalry

Spartan Light horse seems to have been mainly composed of Helots and the lowest classes,  unlike the Athenians who considered their horse to be of the highest social rank.

9x light horse will act as the eyes and ears of the Spartan army spying out the land and running down any retreating enemy troops. Lacking proper armour I have given them leather helmets rather than the more expensive bronze, these are not shock troops but have roll harassing the enemy.

Spartan archers.
So I managed to pick up all my Spartan archers on ebay recently, these are Gorgon miniatures (their Spartans used to be part of the Artizan Designs range) these will represent a mix of Cretan mercenaries and lower class troops armed with bows.


After accidentally dropping my Spartan command base on the floor and watching it bounce woefully to a grinding halt, I fixed a new shrub/tree to its base, I think it could be an improvement on the original version? 

Monday, 1 April 2013

28mm Ancient Roman Gladiators

GLADIATORS
28mm Wargames Foundry Gladiators.

I primed these cool 'Wargames Foundry' minis in black enamel to give a good flat opaque undercoat, then primed the flesh tones with burnt umber oil paint, working through to burnt sienna then mixing with enamel flesh tones each stage was allowed to dry fully, then the browns (several different types) of the leather straps, shoes were painted. The nappy colours were chosen to give a variety within the group. The metals were dry brushed on then cleaned up with oil washes flooded over to give a worn look. The basing was the last stage, these are based on 2p coins which give good stability when gaming due to their weight. A sand effect was obtained through dry brushing building up to a almost white colour.


I took about a week to finish these, I don't believe in rushing any job.


Saturday, 30 March 2013

28mm Ancient Athenian Greek Army - The Peloponnesian Wars.

I've spent a couple of weeks painting the remaining  lower class hoplites for my Athenian Army, I usually paint all the details before adding the spears and then launching into the final basing stage. I don't hold back on colours but use a varied colour palate. I tend to paint enmasse after I have painted a few samples to set the benchmark. The trick is not to rush ANY stage. I just plod along listening to the BBC radio iplayer or listen to the free audio book 'The history of the Peloponnesian War by Thucydides' at: http://www.booksshouldbefree.com/book/the-history-of-the-peloponnesian-war-by-thucydides

All the spears are supaglued on. These figures are manufactured by 'Wargames Foundry', the hoplite spears are from 'Aventine miniatures'. 
Here I've supaglued the figures to plasticard bases, each figure has a 20mm frontage and 20mm depth, the bases are now ready for rendering with polyfilla.
Then I've levelled out the base with 'sand less filler' purchased from B&Q, lightly brushed thinned out PVA and sprinkled with various grades of rock, finally adding sawdust to create texture. This is allowed to dry for 24 hours before the next stage....
The final basing stage is achieved with grass and scrub added.

Medium Amoured hoplites just need their shields.
 Athenian general Perikles and chums; The Athenian command base - finished some time ago, maybe I'll add some long grass. Mostly 'Wargames Foundry' figures except the figure pointing which is from 'Black Tree'.
 Athenian command side view
Athenian command with a runner/messenger leaning on a marble column.

The Initial Idea was to create two factions armies to fight the Peloponnesian War campaign; The Lacedaemonian Alliance and the Athenian Empire, but I'm thinking of expanding the forces to represent other cities in the war, namely Corinth and Thebes, maybe Syracuse etc. Thracian mercenaries and Perdikkas II Macedonian Army I'm painting over these weeks can make an appearance in the campaign.

This project is one of many I have developing at the same time.

Other pictures to follow as units are finished e.g. Spartan hoplites, Athenian Armoured Hoplites, etc...

Greek Peltasts for my Athenians. Scrub and grass to be added later.

Peltasts in the front line

Peltast shields based on designs found on Greek pottery.

Peltasts supported by light cavalry.

Heavy Cavalry forms part of a small Athenian cavalry contingent.
Heavy cavalry ride past heavily armoured hoplites

Light Cavalry forms the remainder of the Athenian Cavalry.