Pages

Friday 6 December 2013

Wars of the Roses 1455-1485

Hi, here is the command base painted last week for Lord Thomas Stanley Earl of Derby.


Sir Thomas Stanley 1st Earl of Derby (1435-1504)

One of Stanley's retainers, livery tawney & green, badge a eagles/falcons claw 'Or'. 

Stanley's personal standard a swallow-tailed banner is hand-painted on metal foil, so it can be reshaped to give the appearance of fluttering in the wind.

Thomas Stanley fought throughout the Wars of the Roses, shifting allegiances a number of times, a true survivor he eventually died of old age in 1504.

These miniatures are 28mm scale manufactured by Perrry miniatures and painted by me at theminiaturepaintingstudio@live.co.uk

The base is 60mm in diameter textured with grass, grass tufts and red flowers to denote his Lancastrian loyalties.

Lord Clifford - with his personal standard.


Thomas Courtney Earl of Devon - with his personal swallow tailed standard.


Walter Devereux Lord Ferrers - with personal standard.


Earl of Essex - with personal standard.


miscellaneous stuff.

Monk & lady vignette.
light bombard.

The Master gunner signals the firing of a light bombard.


This page will be updated when I have some free time.

Thursday 7 November 2013

WW2 in 28mm (1/56th scale) British Armoured Platoon 1944-1945

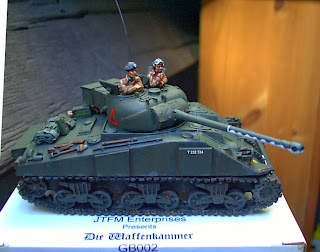
The Sherman mk.Vc 'Firefly' circa.1944

The 23rd Hussars Tank Regiment.

Continuing with my British armoured platoon of 1944 -1945 European Theater of War, I decided my infantry needed some armour for the 1944 Normandy to the battle of the Bulge scenarios. So I picked up a Sherman firefly complete with 17 pounder gun for some firepower.

Die Waffenkammer make a really nice Sherman mkVc firefly so I thought I give it a go.


 The tracks are separate but come fitted to the hull by the manufacterer so that a perfect effect is ensured, I wish all manufacturers could be this diligent! This does save a lot of frustration...I mean it really does.

A superb clean model, I actually followed the manufacturer's instructions and did wash it with detergent to remove any release agent that might be left on the model from the manufacturing process.

Then I primed it with a medium grey matt enamel paint., followed by a dark green paint.

I got a bit carried away and forgot to take pictures for each stage of the painting process, but it was a surprisingly quick job. Then just add the waterslide transfer decals, let them dry out and add a weathering effect over the whole vehicle.

The '51' decals show the red senior tank regiment of the Brigade, in this case the 23rd Hussars was the senior regiment above the 3rd Royal Tank Regiment and the 2nd Fife & Forfar regiments of the Brigade 

The Red triangle denotes 'A' squadron

Die waffenkamer provides a lot of extras with their model, stowage, seperate tracks and a tank commander, here I have a die waffenkamer tankie with a Warlord games tank commander. The aerial was added from some garden wire.


 The Yellow decal with a black bull denotes it is a tank of the 11th Armoured Division


The gun barrel has a wavy line down it to make it look like the shorter 75mm barrel used on the Mark V Sherman tanks used by the British in 1944. Disguising the fact that it is a 17 pounder tank buster gun instead.

Next post I might feature some stuff I'm flogging on ebay.

Cheerio.

WW2 in 28mm (1/56th scale) British Armoured Platoon 1944-1945

Hi, just managed to finish the third and final section of British infantry for my European Theater of War 1944-45.
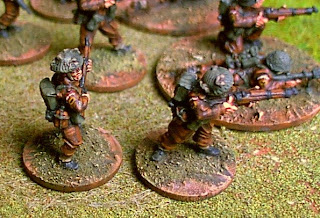
3rd section of British infantry
Most of these have scrim (burlap) on their helmets added after I bought them from ArtizanDesigns.com, below is a short instruction on how to add scrim to plain metal helmets.

stage #1
ideally you want to add the scrim effect before you paint the figures but it really isn't essential, so here I've managed half paint the figures then realize I wanted scrim on the helmets.  

 stage#2
Acquire some 'green stuff' you can get it on ebay, roll the yellow and blue putty together until it becomes a green colour, this will remain pliable for hours. Place a small ball of 'green stuff' on the top of the helmet, then squish it down so it becomes a very thin layer over the helmet (i.e. you can see the helmet shape under it). then get a pin or scalpel blade etc. and prick tiny dints or dimples in the putty to simulate the texture of scrim netting.

stage#3
Whilst the green stuff is still pliable flatten some out really thinly on a mat and cut into strips approximately 5mm long x 1mm wide, then using your scalpel place the strip onto the helmet and fold it over in a wiggly shape, you can easily place 5 or more strips on each helmet. No glue is needed as the putty scrim sticks perfectly together on the helmet.


stage#4
Wait 24 hours for the 'green stuff' putty to harden.

stage#5
Undercoat with matt black enamel paint. Let this dry fully. then paint dark green undercoat and then paint successive layers of olive greens on the netting and light tans to represent the strips of sacking used for the scrim or burlap. 
 Both squaddies have their helmets camouflaged up.


That's it really, a neat and very uncomplicated way to convert your minis to wear scrimmed up helmets. It does make quite a difference to the original model.

Next post will feature the Sherman mark.Vc 'Firefly' for a 1944 European Theater of War game.


Wednesday 6 November 2013

WW2 in 28mm (1/56th scale) British Armoured Platoon 1944-1945

I'm continuing to paint up my 8th Battalion Rifles - Motor Infantry Platoon with the 2nd Section (squad) finished and varnished pictured below.
2nd section 8th Rifles
The 2nd section is split into two unequal halves of:
Rifle Group
1 corporal armed with a sten gun
3 riflemen with SMLE rifles
1 rifleman with a PIAT (anti-tank weapon)
Gun Group
1 lance corporal armed with a sten gun
1 Bren gunner
1 loader with SMLE rifle

2nd section 8th Rifles

The Platoon HQ has been completed as well. Comprising 6 figures: The platoon commander (a lieutenant), the platoon sergeant and a signaller (radio op.) and 3 others, one of which has a small handheld 2 inch mortar used for laying a smoke screen.

Platoon Commander (Lieutenant) with a pistol and Platoon Sergeant with a Thompson Sub Machine Gun (SMG).
The third section will follow together with a quick guide to converting steel helmets to have scrim netting.
All these figures are 28mm miniatures I bought unpainted from ArtizanDesigns.com


Sunday 20 October 2013

WW2 in 28mm (1/56th scale) British Armoured Platoon 1944-1945

British Armoured Platoon  - (29th Armoured Brigade, 11th Armoured Division.)

Introduction.
I've been collecting 28mm figures for a World War 2 bash sometime in the future, starting with a British armoured platoon based on units of the 11th Armoured Division 1944 & 1945.

After selecting 'Rules of Engagement' (RoE) as my chosen ruleset I set about looking for miniatures which I'd like to paint settling on Artizan Designs WW2 range of 28mm figures representing the 8th Battalion Rifles the 'infantry' part of 29th Armoured Brigade

The Army list I have used is the new free to download 'British Motor Platoon 1944' available from: http://www.greatescapegames.co.uk/rules-of-engagement/downloads/orders-of-battle/late-war

8th Battalion Rifles - Motor Infantry Platoon  - indicating these Infantry can be equipped with M5 half-tracks.

The Platoon will consist of:
1 Infantry Platoon HQ section
the section is mounted in a M3A1 armoured car
3 Infantry sections (squads) (maximum of 2 PIAT and added as additional equipment)
each section is mounted in a M5 halftrack

Support Options:
1 Company support section sustained fire Heavy Machine Gun (2nd (Independent) Machine Gun Company of the Royal Northumberland Fusiliers)
the section is mounted in a universal carrier

1 Company support section with 3 inch mortar
 the section is mounted in a universal carrier

1 Divisional support 1x tank (Sherman Vc for a 1944 game or Comet A34 for a 1945 game).

using RoE rules this gives me a Combat Effectiveness (CE) of 24

The Armoured infantry representing the 8th Battalion Rifles


This is the first section of ten men I've managed to complete this weekend, The section is split in two unequal halves of:
Rifle Group
1 corporal  armed with a sten gun
3 riflemen with SMLE rifles
1 rifleman with a PIAT (anti-tank weapon)
Gun Group
1 lance corporal armed with a sten gun
1 Bren gunner
1 loader with SMLE rifle
Bren gunner in the foreground, PIAT gunner in the background.
Each section of eight infantrymen will be mounted in a M5 half-track vehicle.


Each infantryman has a red strip on their arms with the Regimental name on it and the yellow badge with a black bull on it denoting that they belong to the 11th Armoured Division. The Corporal has a two striped chevron on his arms, the lance corporal just a single striped chevron.

I will crack on with the remaining 2 infantry sections and the Platoon HQ section next weekend.

Lance Corporal Smith performing a close recce through the woods
The PIAT (Projector Infantry Anti-Tank) was a somewhat limited tank killer.
I chosen Artizan Design 28mm miniatures WW2 range because they produce a good range of different poses also they're made out of tin alloy and they paint up nice too.

Most of the helmets are converted to have scrim netting and camouflage on them, this was achieved using 'green stuff' smoothed over the helmet then a netting effect marked onto it with a pin or the tip of a scalpel and finally small pieces of scrim (to simulate torn up strips of sandbags) rolled out into tiny lengths then curled up and placed on the helmet to complete the effect. I'll try and get some closeup photos next to demonstrate how easy and effective it is. 


Thursday 17 October 2013

WW2 in 28mm (1/56th scale) British Armoured Platoon 1944-1945

British Armoured Platoon  - (29th Armoured Brigade, 11th Armoured Division.)

Introduction.
I've been collecting 28mm figures for a World War 2 bash sometime in the future, starting with a British armoured platoon based on units of the 11th Armoured Division 1944 & 1945.

After selecting 'Rules of Engagement' (RoE) as my chosen ruleset I set about looking for miniatures which I'd like to paint settling on Artizan Designs WW2 range of 28mm figures representing the 8th Battalion Rifles the 'infantry' part of 29th Armoured Brigade

The Army list I have used is the new free to download 'British Motor Platoon 1944' available from: http://www.greatescapegames.co.uk/rules-of-engagement/downloads/orders-of-battle/late-war

The Platoon will consist of:
1 Infantry Platoon HQ section
the section is mounted in a M3A1 armoured car
3 Infantry sections (squads) (maximum of 2 PIAT and added as additional equipment)
each section is mounted in a M5 halftrack

Support Options:
1 Company support section sustained fire Heavy Machine Gun (2nd (Independent) Machine Gun Company of the Royal Northumberland Fusiliers)
the section is mounted in a universal carrier

1 Company support section with 3 inch mortar
 the section is mounted in a universal carrier

1 Divisional support 1x tank (Sherman Vc for a 1944 game or Comet A34 for a 1945 game).

using RoE rules this gives me a Combat Effectiveness (CE) of 24

RoE Divisional support: 1x Comet(A34) Tank, as I can only use this tank from 1945 I'll try to buy a Sherman markV or  Sherman Vc 'firefly' for a mid to late 1944 game.

 The chosen model was the A-34 'Comet' from the Die Waffenkammer range available through  JTFM. I found that the manufacturer had fitted the tracks to the hull perfectly, also little details such as the headlights and headlight guards were part of the resin casting on the hull which I found to be a big bonus. This has been the best produced 1/56th scale model I have bought to date 10/10 for quality.
A-34 Comet 2nd Fife & Forfar Regiment 11th Armoured Division 1945.
Apparently the naming convention for this regiment when equipped with the comet tank were the names of saints for the Regimental Headquaters Squadron, alas I acquired a limited transfer sheet of names and chose venus for this model.

The only other names I can find for this regiment are:

BROWN JACK squadron & serial unknown.
WHY WORRY?   squadron unknown, serial  T335346

The regiment code is 53 white lettering on red square, divisional badge black bull on yellow rectangle.

markings front view
markings rear view

The squadron markings are in blue, diamond for HQ squadron, triangle for the A squadron, square for B squadron and circle for C squadron. I've added a bridging disc denoting 40 ton load, the comet is actual weight is somewhat closer to approx 33 tons.


The tank commander is from Warlord Games Bolt action range.


Extra details were added such as the coiled searchlight cable, aerial and padding on the inside of the open hatch.

The Comet tank had a 77mmL50 gun capable of firing APCBC, HE and APDS, the projectile was identical to the 17pdr on the Sherman Firefly but the cartridge was different with lower muzzle velocity and thus less penetration.

The Armoured infantry representing the 8th Battalion Rifle Brigade will be next.
to be continued....

Sunday 6 October 2013

The Hundred Years War


Hi,
 Just another brief post cos I'm a bit busy at the moment, but here is a command base painted this week available to purchase on at the moment: Guillaume de Vienna Burgundian commander during the blockade of Calaise 1406.


Guillaume de Vienna
28mm figure on a 50mm diameter round base.

The miniature is manufactured by Wargames Foundry from their Hundred Years War range of 28mm figurines and painted by me at theminiaturepaintingstudio@live.co.uk


Saturday 21 September 2013

Armies and Enemies of Louis the XIV and the The French-Dutch War of 1672-1678

The French Army: I've already completed two Dutch foot Regiments for my French-Dutch war, (see previous posts) I decided to start on my late 17th century French Army specifically the French Generals command base. I used a couple of paintings for inspiration, one of Grand Conde (battle of Seneffe) and one of general Turenne (battle of Turckheim), though until a manufacturer makes these specific generals I had to make do with generic officers manufactured by 'Front Rank.
'The officers on foot could represent any personalites or regiments as officers generally wore whatever clothing they wished.
I try to add some campaign/battlefield items but find you can easily overdo it, too little is often better than too much.
A sense of urgency has been injected into the vignette by the pointing officer on foot. He is a Guard Francaise officer from 1672 this is before they adopted the famous blue uniform.
A grey coated subordinate officer hands over a map to the blue coated officer on horse
I have painted eyes on each miniature but my photography skills leave much to be desired


Painting Method.

After I primed these 'Front Rank' minis in black enamel to give a good flat opaque undercoat, I wanted to start on the faces first as these give character to the miniatures almost immediately. 

After undercoating the flesh areas with matt white enamel, flesh was mixed from red + yellow + white and painted thinly over the undercoated areas, then a wash of burnt sienna oil paint was applied giving the faces a somewhat suntanned effect. 

 I worked through burnt sienna acrylic mixed with white building up the flesh tones. 

Each stage was allowed to dry fully, then the blacks and greys of the leather straps, shoes were painted. The metals were dry brushed on (gold acrylic) then cleaned up with oil washes flooded over to give a worn look (burnt umber oilpaint) then highlighted with acrylic gold paint. Oil paints Enamel paints and acrylics were used to produce various effects.

The basing was the almost last stage, the miniatures are supaglued to a 80mm round mdf base resulting in a compact vignette. Polyfilla was added to level off the ground, then PVA glue was liberally brushed on with an old no.2 brush,  rocks were sprinkled over the area then sawdust of various grades applied. The dirt/earth effect was obtained by mixing burnt umber oil paint with enamel leather colour, then dry brushing in lighter tones of burnt umber oil paint/leather enamel/yellow enamel/white enamel building up to the lightest colour.

Grass and flowers and a scrub bush were added before the final coat of 'Testors Dullcote' matt varnish which flattens the painting effects.


The mdf base is from http://www.warbases.co.uk the grass is from 'War Painter' available from most wargames online stores and ebay. The small bush I made myself.

Next will be The French Infantry Regiments Picardie and Navarre.